Growing Your Own Spuds
How to Grow Your Own Potatoes

Reading Time: 4 minutes
By Kristi Cook – Potatoes are one of the most versatile root vegetables to grace a garden. There are white potatoes, yellow potatoes, red potatoes, even purple potatoes. Starchy potatoes, dry potatoes, large potatoes, fingerling potatoes. If you enjoy potatoes, rest assured there’s at least one variety that will suit your tastebuds. Even better, this humble root adapts well to several planting techniques provided you offer the right temperatures, the correct soil, and sufficient water.
Cool Weather
The trickiest part when growing potatoes is the timing. Small tubers called seed potatoes are planted during cool weather when soil temps are around 45-55 degrees F. For most areas, this is within a week or two of the last frost or even a few weeks before the last frost date. Light frosts are usually handled well, provided a light row cover or sheet is used to provide a bit of frost protection for those delicate growing leaves. However, if your area is expecting cooler than normal temps accompanied by a large amount of rain, it’s best to have a slightly later planting date to avoid cool, soggy soil that can lead to rot. However, if tubers are already in the ground and settled in before less than perfect weather appears, many varieties will hold up well with only the smaller seed potatoes rotting.
Loose Soil
The second most important factor for a successful harvest is loose, friable soil. Potatoes don’t grow well in heavy soils that don’t allow the tubers to bulk up and spread out. Traditionally, seed potatoes are spaced 1-2’ apart in a trench that’s 6-8” deep, then covered with only a few inches of soil initially. Once the emerging green shoots reach about 6” tall, more loose soil is mounded around the growing plant, leaving only the top half uncovered. Every couple of weeks, this hilling process is repeated until the hilled soil is about 8-10” above the ground.
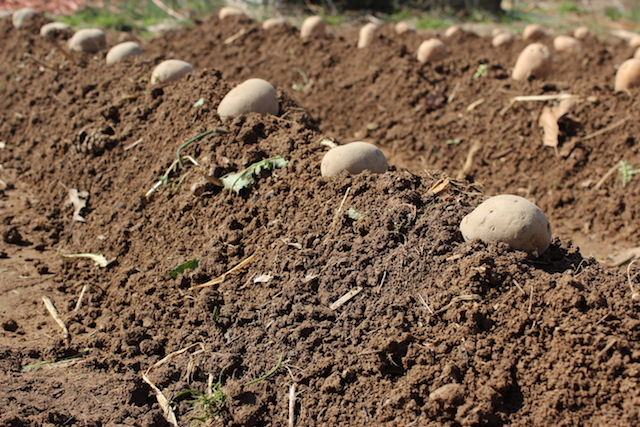
However, the traditional method isn’t the only way to grow potatoes. Tubers adapt readily to many different planting techniques. Perhaps the easiest is placing seed potatoes on top of freshly worked soil and then covered with a few more inches of soil. No trenching nor hilling required. I’ve found this method particularly suited to those extra busy springs when I don’t have the time to make nice little hills nor perfectly measured trenches, and the potatoes do just fine so long as I don’t forget to water and mound up around them as they grow.
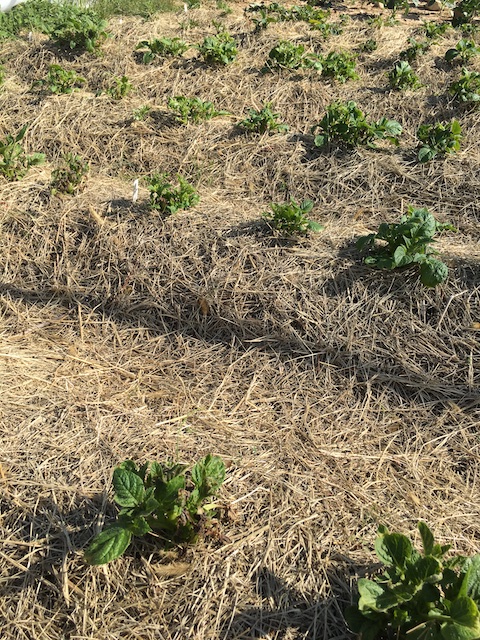
The key to making this method work is twofold. First, don’t tamp the soil down around the potato as it needs the soil beneath to remain loose for proper root growth. Then, place a good 2-3” of straw or other seedless mulch on top of the row to keep the loose soil from being washed away in rain or blown away in heavy winds. If you’re fortunate enough to have extra loose soil on hand instead of straw, toss that soil on top in lieu of the straw. Follow up with a light watering to help the straw or extra soil lay down to protect the planting.
As in the traditional method, once the emerging greenery reaches 6” tall, begin hilling the plants with either soil, if it’s available, or thick layers of more straw. If using only straw, however, be sure to keep the straw moist and well-watered so the developing spuds don’t shrivel and dry up into nothing.
Other methods, especially when space is limited, are growing potatoes in a bag or a bucket, totes, and even aged compost piles. Often, these methods incorporate a mix of compost and straw for the growing medium which helps keep the containers light enough for moving around as needed. Harvests with these methods are often a bit smaller than when planting directly in the garden, yet are usually sufficient for the smaller scale gardener. And of course, they’ll be just as tasty.
Harvest
Regardless of the method you choose, once the potatoes are hilled, the main objective is keeping them watered with 1-2” each week. Then, two to three weeks following flowering, gently dig up a few new potatoes for a meal, replacing the soil to protect the still developing tubers. You can collect these new potatoes from each plant usually once during the growing season with little noticeable reduction in overall production.
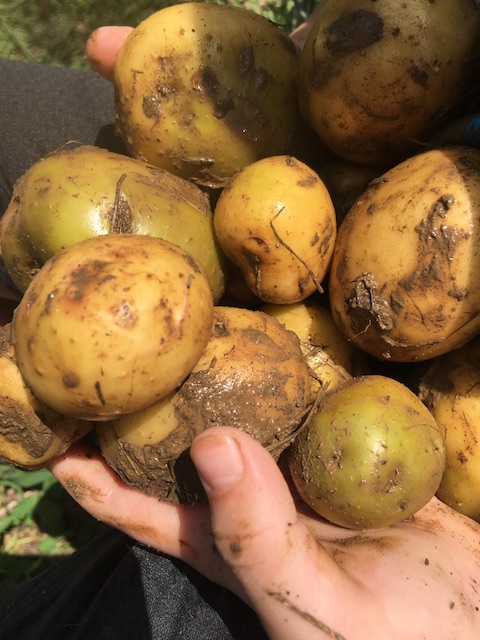
For the main harvest, wait until a couple of weeks after the foliage dies back, then gently dig up the remaining tubers. If you chose containers instead of the in-ground planting methods, just dump the entire container
gently on the ground and run your fingers through the loose compost
and straw to gather up your prizes. Do use a spade or shovel carefully, however, to avoid cutting into the tender flesh as any injuries to the tubers will reduce the storage life.
Once you have your harvest in hand, allow tubers to cure for three weeks in a cool, dry area out of direct sunlight. Store cured potatoes in a root cellar or, if the harvest is small enough, in an extra crisper drawer in the refrigerator. If your winters are mild enough, tubers can even be stored in the ground. The downside to this storage method is more tubers will rot as the winter progresses, but if you harvest frequently enough, the loss should be kept to a minimum.
Growing a winter stash of potatoes is a simple matter of correct timing, a bit of hill work, and good watering. And no matter what type of potato you prefer, there’s sure to be a variety that will do well in your garden with your chosen method. The hard part is deciding which variety to try.
Originally published in the January/February 2021 issue of Countryside & Small Stock Journal and regularly vetted for accuracy.


