Soap Making Techniques: Which is Right for You?
From Easy Soap Recipes for Beginners to Beautiful Artisan Methods

Reading Time: 9 minutes
Soap making is an old art with changing history. And it’s not all made the same way. Different ingredients, temperatures, and curing times come into play. If you want to learn how to make soap, first decide which soap making techniques you’re most comfortable with using.
But What is Soap?
By chemical terminology, soap is a salt: an ionic compound resulting from neutralization of an acid and a base. Different “soaps” exist, such as calcium or lithium emulsions used in lubricating grease. Soaps for personal hygiene are made with fatty acids, such as animal fats and vegetable oils, combined with extremely alkaline solution such as lye or potash mixed with water. The chemical change is called saponification.
Two types of hygiene soaps exist: Soaps made with sodium hydroxide (lye) are solid while potassium soaps (potassium hydroxide, or potash) are soft, often liquid. Most old-fashioned soapmaking techniques were for soft potassium soaps, because the alkali was extracted from wood ashes then cooked over an open fire with animal fat. Pioneers and homesteaders stored the end product in boxes or ceramic crocks and scooped out what they needed. Historically, the term “lye” has referred to potash, but true lye (sodium hydroxide) is a fairly modern chemical and must be made within an industrial setting.
Both sodium and potassium hydroxide are dangerous because of their high alkalinity. Lye holds a favored place among murder mysteries and crime dramas because of its ability to digest animal and human tissues. A drop of lye solution can “burn” the skin or cause lasting eye damage, especially if it’s not washed away immediately.
Because of the potential danger of the ingredients, it’s crucial to fully research soapmaking before you try it. Also, decide which method is best for you.
Melt and Pour
The safest of all techniques, melt and pour soap recipes can involve children as long as they’re protected from potentially hot splashes. There are no dangerous chemicals and little chance of injury aside from superficial burns. This is one of two choices for how to make soap without lye.
Melt and pour bases are premade. To craft soaps, purchase a block from a distributor. Cut it with a sturdy knife, melt in a microwave or double boiler, and add color and fragrance before pouring the base into molds. After the soap has set, pop it out of the mold and it’s ready to use. This soap making technique can be completed within an hour or two.
The advantage of melt and pour soaps is the safety. The melting point is never boiling unless you overheat; usually it’s not hot enough to scald if you remove it from the heat source as soon as it’s liquefied. Add-ins such as fragrances and flower petals don’t transform because the soap mixture is already neutral. You can add almost anything you want such as small toys, crushed herbs, or glitter. Melt and pour soaps work with almost any mold, unlike true soaps which might melt the molds or might react to aluminum.
Everything has downsides, though. Melt and pour soap cannot be called “natural,” since they contain petroleum products. This is necessary to facilitate the frequent melting and hardening. Many people also consider the soaps to be drying, since they contain no natural glycerin (only added glycerin that is an industrial product). The base makes cute crafts but it’s not the best bet for sensitive skin.
If you want a more natural melt and pour soap, research how to make glycerin soap base from scratch. Warning, though: This soap making techniques involves lye. To make a glycerin soap without lye, you must use a pre-made base.
Milling/Rebatching
French-milled soaps are cold-processed bars that have been “milled,” or ground up, several times to a smooth paste before they are pressed into attractive forms. Triple-milled soaps have been ground up three times for extra smoothness. This creates a luxurious texture and lather but also keeps batch color uniform so there is no streaking or uneven shading. Though you can’t call your soaps “French-milled” unless you produced them in France using this specific technique, you can still mill your own soaps.
By using existing cold-process soaps, you skip the steps involving lye and cure time. So though milled soaps aren’t as “from scratch” as hot or cold processed soaps, they can be made with the same natural ingredients.
Many soapmakers produce a “master” batch of cold process soap to mill/rebatch for attractive and chemically stable bars. Fragrances which would cause the original batch of soap to seize or turn brown stay fresh within rebatching. This soap making technique is also a great way to turn ugly soaping mistakes into attractive bars. If the original soap was produced correctly, using the correct ratios of lye to oil, but seized or separated during production, it can be grated down and rebatched.
To rebatch, grate down a bar of cold process soap. Place it with a little liquid such as water or goat milk. Soap should then be slowly melted until it can be stirred and easily incorporates with the liquid. This can be done in a microwave, crock pot, or within a heat-resistant plastic bag placed in boiling water, and can take an hour or longer. Once the mixture is melted to a thick, goopy texture, add in any additional ingredients such as botanicals and color. Press into molds. After it cools and hardens it’s ready to use.
Hot and Cold Process: The Most Natural Ingredients
Since both hot and cold process involves from-scratch ingredients, you can make the purest product. All lye and water are used up within correct saponification. That means that a properly made bar of coconut oil soap only contains coconut oil. By knowing how to make soap from scratch you can eliminate all the detergents and fragrances which can cause allergic reactions.
Safety gear must be used during both of these soap making techniques, including goggles/glasses, gloves, long sleeves, and correct ventilation to avoid breathing the fumes that waft out when lye is added to water. The correct tools must be used, such as stainless steel or silicon spoons instead of aluminum. All pets and small children must be kept away from the soaping area. Spills must be correctly cleaned up so they don’t damage anything that comes in contact with them later. And though ingredients can be hazardous if used incorrectly, it is easily managed with a little education.

Hot Process
Using the same oil and lye concentrations as cold process, hot process (HP) has the advantage of being usable almost immediately. This is because the near-boiling temperatures process out lye that would otherwise take six weeks to mellow.
Home soapmakers usually hot process in ovens, double boilers, or crock pots. It is a good soap making technique for people just learning how to make soap because the ratios of lye to oil don’t have to be quite as precise as with cold process. All saponification takes place in the pot, cooking until the soap reaches the “gel” stage. Before chemically pure lye became available, old-fashioned soapers often used the hot soap making technique because they could not guarantee the exact alkalinity of the wood ash or potash. So they stood over pots in the open air, watching and stirring until the concoction was just right.
Hot process involves measuring out fragrances and colorants first because there might not be much time to add them at the end. Lye is added to water in one container; oils are measured into the pan or crock pot. Unlike with cold process, the oils don’t need to cool before lye is mixed in. The lye solution is slowly added then the soap is agitated (stirred) until it resembles a pudding-like thickness called “trace.” The soap is then cooked at a low temperature until it bubbles up and hits the gel stage. Color/fragrance are added then the soapmaker scoops the hot, gooey mess into a mold. After up to forty-eight hours, the soap is unmolded then cut.
HP soap often doesn’t turn out as pretty because the saponification stage can happen fast. A soapmaker must be ready to stir in fragrance and color before quickly spooning it all into a mold before it hardens. This can be so difficult that hot process soap is often lumpy. Though this isn’t the best soap making technique for artisan soaps, it’s perfect for making laundry soap which will later be ground down to mix with borax and washing soda.

Cold Process
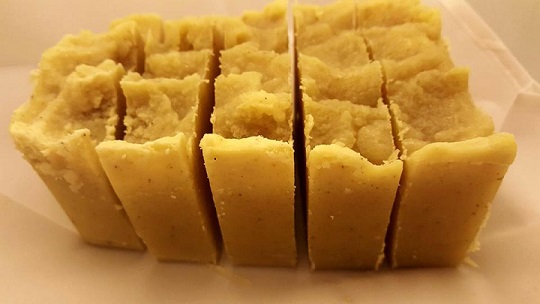
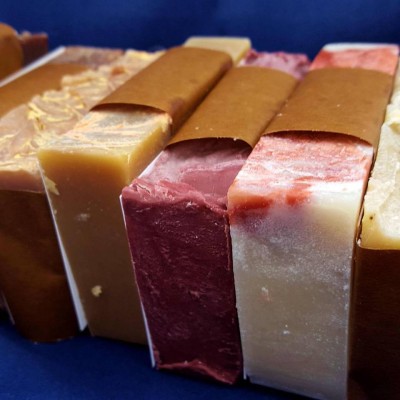
The crowning soap making technique of artisan soapmakers is cold process. Because saponification is slower, crafters have time to create beautiful swirls and combinations. The end product is smoother than hot process, unless the product seizes (suddenly hardens). Most soapmakers who work toward a beautiful product choose cold process.
Melanie Teegarden, master soapmaker for Althaea Soaps , says, “My specific method is CPOP—which stands for Cold Process Oven Process. I like the fluidity of the CP method because it allows me to make complex designs and swirls since the soap is more fluid than in hot process. By placing the soap in a warm oven after molding I feel I can have the best of both worlds with a full gel and a head start on driving off excess water weight.”
The primary advantage of CP is that it’s more esthetically pleasing. Most of the heat is created during chemical reactions, and though those temperatures can top 180 degrees and melt cheap plastics, you’re not stirring a simmering pot.
Cold process involves mixing lye into distilled water in one pot and bringing oils/fats up to temperature in another. Once the lye mixture has cooled and the oil has warmed to the same temperature, the lye mixture is slowly poured into the oil. The soapmaker then agitates the mixture low to no heat until it reaches “trace.” This can take five minutes to one hour, depending on the type of oil used. After that, additional ingredients such as fragrance and coloring are added before the soap is poured into heat-resistant non-metallic molds. The soap is set aside in a warm location as it undergoes the gel stage of saponification. It is safe to use within twenty-four to forty-eight hours but is much mellower and lasts longer if it’s allowed to cure in a ventilated area for up to six weeks.
Because the mixture stays alkaline for so long, certain additives are unstable. Flower petals quickly turn brown. Vanilla fragrance turns a white soap a deep chocolate color unless stabilizer is used. Some floral or fruity fragrances cause seizing or ricing (when the mixture partially seizes into little clumps.) With correct education, you can learn how to deal with all these issues and still make beautiful soap.

Study Up First
The directions given here are very basic. Do not attempt to make soap until you have read literature that goes into greater detail of the soap making technique you wish to use, outlining safety protocols and troubleshooting.
If you want to attempt hot or cold process soap, you need to know about saponification values, which refer to the specific amounts of lye each oil needs. Olive oil has a different SAP than palm oil, and not following the exact recipe can result in dangerously lye-heavy soap. You also need to know why lye should be added to water, not the other way around. And what to do if you have a caustic volcano or if your soap overflows its containers during the gel stage. All of this information can be found within published books on how to make soap, but it’s also useful to join a soapmaking forum for specific questions.
Once you’ve fully researched, you may be excited to open your own business. Veteran soapmakers advise against this. Just knowing how to do something doesn’t equal being adept at it. Overly anxious neophytes prematurely sell soaps that are poorly made, lye-heavy, or quickly go rancid. This negative experience convinces the customer that homemade soaps are inferior (quite the opposite) and the customer turns down a well-made bar the next time he is offered it.
Melanie Teegarden says of her online business: “The bulk of my soap customers have always been repeat customers. They find something that works for them and they keep coming back for more. Although it’s fairly easy to make soap, it is more difficult to make soap that comes out consistently the way you want it time after time. If I were to sell soap that was not consistent, the majority of my repeat business would dry up. Not to mention I use the soap myself as do my friends and family, and they trust me to have a product with consistent quality.”
This isn’t to discourage new soapmakers from working toward entrepreneurship. Master soapmaking is a welcome trade. But those who have worked for years refining their art ask that you make the soap for your family, practicing often, then join the trade when you have a product you can be proud of.
Before you research how to make soap, first decide which method you want. Are you uncomfortable using lye or would you rather have a recipe involving more natural ingredients? Do you want to craft with your children or potentially sell at an artisan show? After deciding which direction you want to take, read up on your desired soap making techniques. The end product is rewarding.
Originally published in 2016 and regularly vetted for accuracy.


Thank you for this lovely informational overview! But please, please, please leave out the suggestion to add glitter or small toys (which are usually plastic). People are in the process of destroying the world with plastics and oil-based chemicals . This grandma encourages each person to incorporate the most natural outlook in his lifestyle as possible. Peace, love, and health to all of you.
Dear moderator,
The second sentence is to the author of the article and you can leave it out if you wish to publish the comment. My concern is that not enough young people are truly cognizant of the appalling damage our older generation has done to the environment. We’ve given them the mindset of the convenience of cheap disposable things which happen to be toxic.
I love Countryside magazine and had been a subscriber some years ago when we lived in the country and I was capable of raising chickens, goats, and garden.
Is there any one else out there who knows that adding Water to Lye produces a much slower reaction, few fumes, is much safer than adding lye to water which produces an instantaneous hot fuming reaction? Why is the same mis information that lye should be added to water propagated? It produces such awful fumes.