DIY Solutions For Off-Grid Cooking
But First, Have An Altoids Mint
Reading Time: 9 minutes
By Jim Cobb – Quite often, utility services are among the first things to go in the wake of a disaster. Tornadoes, blizzards, even just a bad thunderstorm can all result in power lines going down, hopefully just for a few hours, but sometimes it can take days before the lights turn on again. A few years ago, a friend of mine had a bad ice storm hit her area, and it took three full weeks before power was restored.
If you have a wood stove, of course, cooking while off the grid poses little trouble at all. For those who do not, though, this can pose some problems. When the microwave oven and the electric stove top aren’t options, how will you heat water for coffee or warm up a can of soup? Sure, if you have a patio grill you’re probably still in business rather easily. You do realize you can cook more than just a rack of ribs on a grill, right?
However, if you lack a propane or charcoal grill and also don’t own any sort of camp stove, you may need to get a bit creative when it comes to cooking.
Campfire Cooking
Anyone who has done so knows the almost mystical quality of food cooked over an open fire. Even the humble hot dog just seems to taste so much better, doesn’t it? A backyard campfire is surely a great option for off-grid cooking, provided you have the fuel and location for doing so. If you live in an apartment or condo, this might not be the best solution for you. For those who want to explore this option, I would encourage you to get some practice doing so now. There is just as much art as there is science to campfire cooking.
Patio Fire Pits
In recent years, it seems almost as though a law were passed that requires any homeowner who has a patio to purchase a fire pit for it. These come in all sorts of sizes and configurations but, really, all they amount to is a campfire on your patio or deck. Again, as with campfire cooking, these fire pits require fuel and a bit of finesse when preparing the food. Something that makes cooking much easier is the addition of an old grill grate to the fire pit. If you or someone you know replaces their grill, save the grates. They work very well when stretched across the top of the fire pit, making it much easier to place pots of soup and such over the fire.
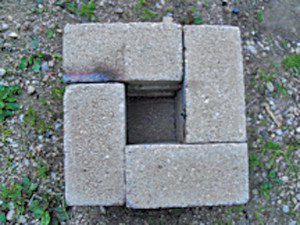
DIY Brick Rocket Stove
If you have ten dollars to invest in the project, you can assemble a quick and dirty rocket stove that works very well. Rocket stoves, whether they are DIY or store-bought, are all essentially the same. They have a small combustion chamber at the bottom and a chimney of sorts for updraft. They are a great option for off-grid cooking because they use far less fuel than campfires or patio fire pits. For this project, you’ll need 20 small bricks. Not cinder blocks or anything fancy, just twenty plain bricks. Patio pavers work great. You do not need to purchase special fire bricks for this project. The fire temperatures you’ll reach will be far less than cause a brick to explode. You can find suitable bricks at any garden store and they should cost less than 50 cents per brick.
You’ll need to cut one of the bricks in half. This is much easier than you might think. Simply score the brick with a file, then use a hammer and chisel to break the brick along the scored line.
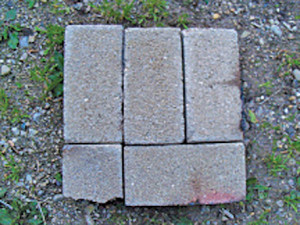
Find a flat spot in your backyard for the stove. You can do this right on the ground or on your patio, though I’d suggest you not place it on a wood deck. Start by laying the first four and a half bricks like layer 1.
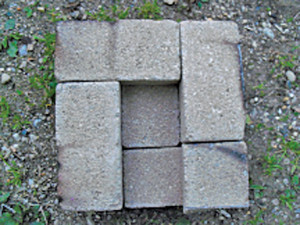
Your next layer will look like layer two. Please pay close attention to the placement of the other half brick you have. Then, layer three.
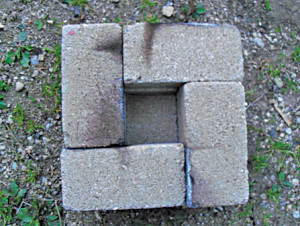
And, finally, the fourth layer:
You should have three bricks left over, right? Place one of them at the opening in the front of the stove to provide you with a shelf on which you’ll place fuel for the stove. The fuel consists of small twigs and branches, about the size of a pencil or maybe a hair thicker. As I always recommend when you’re building a fire, gather plenty of fuel and have it ready before lighting.
What I do is place a small handful of tinder, such as dryer lint, at the bottom of the combustion chamber. Feed a few twigs in through the front and drop in a lit match. The tinder should light easily and start the fuel burning within a couple of minutes. As the fire builds, feed in more fuel until the fire is hot.
Then, place the last two bricks on top of the stove, on either side of the chimney, like so:

This provides you with a stand for your cook pot. If you were to place the pot directly over the chimney, you could smother the fire. If it is fairly windy, you could angle those upper bricks a bit to create a windscreen.
With a strong fire burning, it shouldn’t take much more than maybe five minutes to bring a pot of water to a rolling boil. Just be sure to continue feeding the stove so the fire doesn’t get too low.
The beauty of this DIY rocket stove is you don’t need to have a permanent home for it. Just have the bricks stacked in the corner of your garage or shed until they’re needed. A downside, though, is that the stove isn’t insulated so you aren’t going to have complete combustion of the fuel. This means that, over time, the chimney is going to fill up with charred fuel remnants. In other words, you aren’t going to be able to cook a ton of different things, one after another, without emptying the charred sticks. However, this setup works great for heating water for coffee or cooking a pot of canned stew.
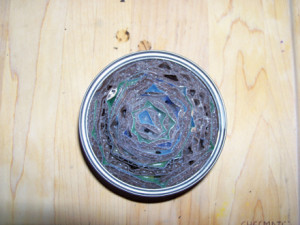
Buddy Burner
This one has been around for quite some time and many a Cub Scout has built one or a variation of it. A buddy burner is simple to assemble, with all of the components readily available in the average home. You’ll need corrugated cardboard, a tuna can, and some old candles or crayons.
If for some reason you don’t have a tuna can, any can of similar size will work, such as for cat food or canned chicken. Start by cutting the cardboard into strips. The strips should be not quite as wide as the can is deep. The cardboard should be cut across the corrugation, so when you look down at the long edge of each strip, you see all the “holes” of the corrugation.
Next, begin wrapping those strips around the inside of the can. Start at the outer edge and work your way to the middle, adding strips until the can is completely full of cardboard.
Now, you need to melt wax for the burner. Old candles and crayons work very well. I’ve found one of the easiest ways to do this, without damaging any of my cookware, is to place a small pot on the stove, filled with a couple inches of water. Bring the water to a gentle boil. Fill an old soup can about halfway with broken crayons (paper removed) and/or pieces of candles and put the soup can in the water. Use a twig or stick to stir the wax as it melts.
Once the wax is fully melted, carefully pour it over the cardboard, working from side to side and front to back to completely cover and fill each of the corrugated holes. Once the wax has cooled and hardened, the buddy burner is ready for use.
To light it, strike a wooden match and hold it just above the wax, until you see the wax start to melt. Then, lay the lit match right on the wax. Within a minute or two, you’ll see a strong flame as the wax burns. To cook over the buddy burner, you’ll need a couple of bricks to hold your pot above the flame.

To douse the flame, simply place a piece of aluminum foil over the burner and hold it down along the sides of the can.
What is nice about the buddy burner is you can use it indoors, unlike the other methods outlined earlier. All the buddy burner really amounts to is a large candle. If you find the wax is starting to run low in the burner, simply add more once it has cooled down.
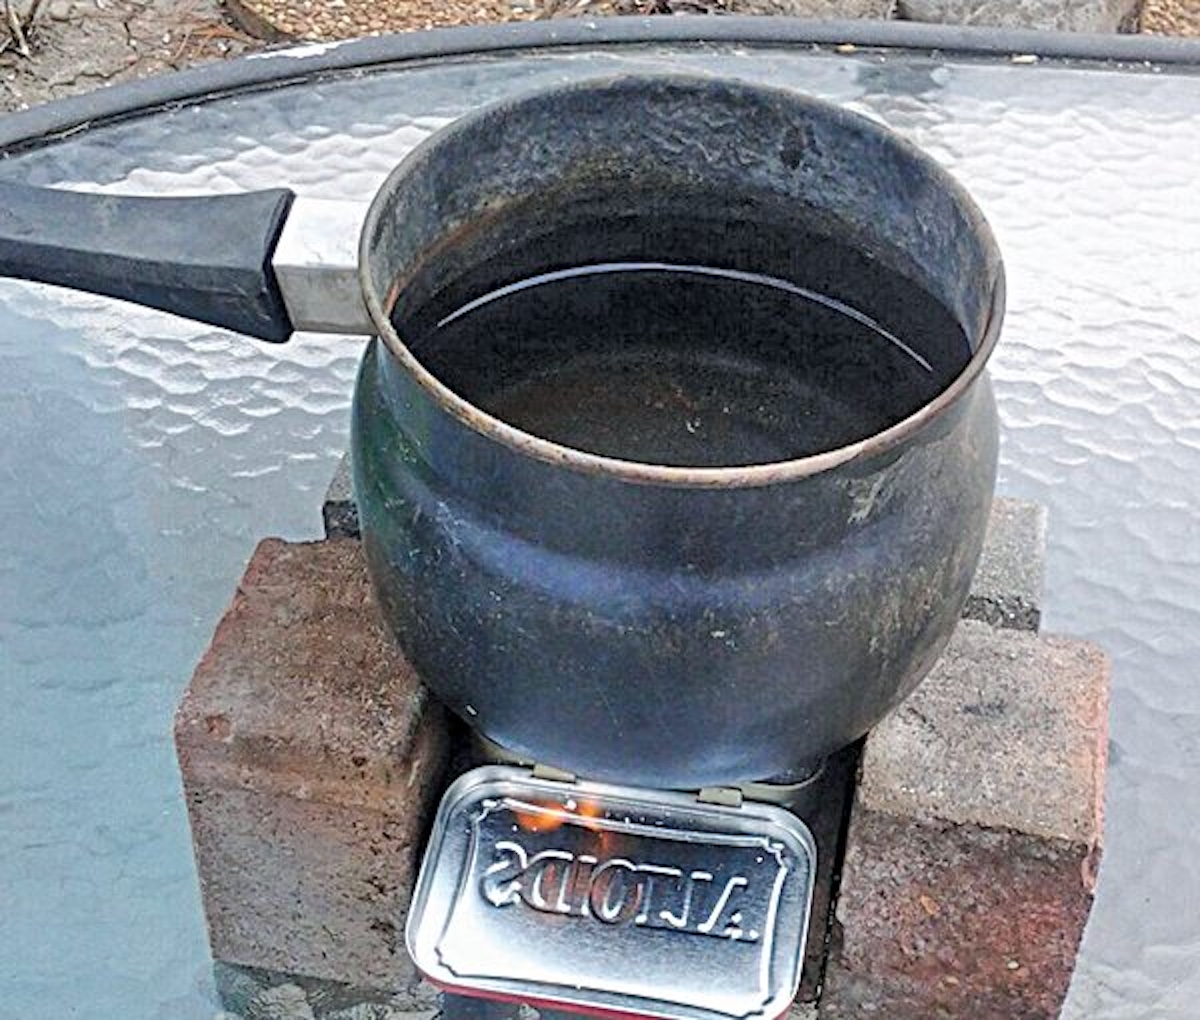
Altoids Tin Alcohol Stove
Altoids tins are almost, though not quite, as useful as duct tape to us preppers. We find all sorts of uses for them, from mini survival kits to candles. Here, we’re going to use one for cooking. You’ll need an empty Altoids tin, some perlite, a piece of window screen, and denatured alcohol.

Start by filling the tin with perlite, up to just below the rim of the tin. Perlite is commonly available at any garden center and is a soil amendment. Here, it is being used due to its absorbent qualities. Some folks like to pick through the perlite and use just the larger chunks for the stove. I’ve never had an issue just pouring some direct from the bag, without sorting through it first.
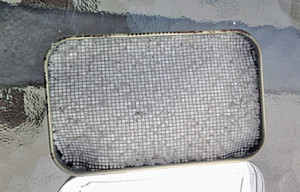
Next, cut a piece of window screen to fit over the top of the perlite. Round the corners a bit and cut it so it just slightly overlaps the tin’s edges. The screen should be metal, not plastic. A piece cut from any old window screen you have sitting in the back of the shed should work nicely. If you don’t have any available, you can buy a small window screen repair kit and use the patches from it for this project.
Place the screen over the perlite and use a popsicle stick or similar item to tuck the edges down between the tin and the perlite.
The fuel for this stove is denatured alcohol, available at any hardware store. In a pinch, you can use the fuel additive HEET or even rubbing alcohol. However, those tend to be “dirty” fuels and you’ll notice more smoke than if you used denatured alcohol. Pour about three tablespoons of fuel right over the top of the perlite and screen. After sealing your fuel container and moving it away from the stove, just to be safe, drop a lit match on the screen. The flame will be mostly blue and might be difficult to see at first. Just a few tablespoons of fuel will be enough to bring water to a boil.

As with the buddy burner, you’ll need a couple of bricks or something to raise your pot above the stove for cooking.
You can smother the flame by flipping the lid closed. However, this does result in unburned fuel staying inside the tin. While that shouldn’t be much of a problem, personally I like to just let the stove burn off any remaining fuel. Bear in mind, too, that it is only the liquid fuel that burns, not the perlite.
This is the stove I keep in my primary survival kit, along with a small plastic bottle of denatured alcohol for fuel. I’ve found it works very well in many weather conditions and is much easier than trying to get a campfire going in the rain.
Even if you have a patio grill and/or a camp stove, it is best to plan multiple ways to cook food during a grid-down emergency. Whenever possible, strive for at least three ways to accomplish a basic survival goal.


